Step 2: LinuxCNC
Installing LinuxCNC in a Virtual Machine
WARNING!
This is a terrible idea and I am only doing it as an experiment!
LinuxCNC runs on a specially-compiled realtime linux kernel to avoid the many ways things can go horribly wrong if you try to run a physical device (especially one that can cause chaos, death and destruction) from a computer that is also thinking about other things like moving the mouse or streaming a YouTube video.
Unless you fully understand just how terrible an idea this is, PLEASE just install LinuxCNC directly to a spare PC.
- Create new VM - I chose Virtualbox “New VM” type “Ubuntu 64-bit”, 8Gb RAM, single core.
NOTE: Convention when talking about VM's is your computer is called the HOST and the virtual machine is the GUEST, otherwise it gets really confusing, like Inception.
I am using my home PC running Linux Mint 18.3 as a host, using Oracle Virtualbox Version 5.2.22 (at time of writing you need to download it from the VirtualBox site NOT the built-in software installer in Mint as for some bizarre reason that installs a broken version!)
My mill uses a generic parallel-port type driver which has a STEP and DIRECTION pin for each axis, plus a few spare inputs & outputs I'm not using just now.
Parallel Port Shenanigans
1st off you need to find your parallel port, in Linux that means doing this:
ls /dev/
In my case this showed lp0 and parport0. parport0 is the one I needed, your mileage may vary.
Next you need to allow yourself access to the port, you can see if you're in the right group by doing:
$ groups
username adm cdrom sudo dip plugdev lpadmin sambashare
I can administer the port but not use it - so I need to add myself:
sudo usermod -a -G lp username
Remember to log out and in again for permission changes to “take”.
Now we need to add the port to the VM, an operation which is not currently doable via the GUI so more typing:
VBoxManage modifyvm "Linux_CNC" --lptmode1 /dev/parport0
A bit of background was found here: https://forums.virtualbox.org/viewtopic.php?t=54187 but it looks like the 2nd step is not really required.
I also had to do this to stop my host system from using the parallel port, it also removes lp0 from the list in /dev/.
sudo modprobe -r lp
VBoxManage documentation says:
–lptmode<1-N> <Device>: Specifies the Device Name of the parallel port that the Parallel Port feature will be using. Use this before –lpt. This feature is host operating system specific. For Windows hosts, use a device name like lpt1 while on Linux hosts you have to use a device name like /dev/lp0
–lpt<1-N> <I/O base> <IRQ>: Specifies the I/O address of the parallel port and the IRQ number that the Parallel Port feature will be using. Optional. Use this after –lptmod. I/O base address and IRQ are the values that guest sees i.e. the values avalable under guest Device Manager.
I found that saving the VM state does not work
When you shutdown a virtual box you can do a “real” shutdown from the guest OS (like shutting a real PC down) or you can choose from the Virtualbox menu “Save machine state” which just freezes the virtual machine as-is until you next use it. It's handy, but I found for whatever reason my LinuxCNC VM stopped talking on the parallel port until I did a proper restart.
Install LinuxCNC
- In VirtualBox - Machine Settings - Storage - add the
linuxcnc-2.7-wheezy.isoimage you just downloaded as the VM's CD-ROM - Boot the VM
- Follow the instructions to install the Linux CNC system
- Reboot the VM when complete
- Debian will likely want to do 100+ updates, according to LinuxCNC you can safely do all of them EXCEPT kernel/distribution upgrades as these may bork the kernel.
Setup LinuxCNC
Applications - CNC - Stepconf Wizard… RTFM
I cheated as there was a Mach3 config file with my mill that at least gave the correct parallel port pins;
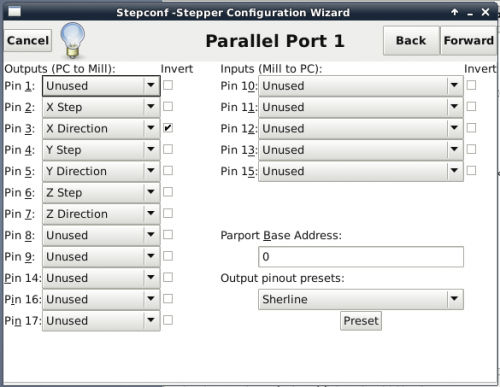
I then had to do a little bit of trial-and-error to arrive at the correct settings as I did not know the microstepping setting of my driver and it's mounted in such a way that you can't take the lid off to look at the switches.


My stepconf and INI files ended up looking like this.